So this project came to me when I was running one day...That is when I get the best ideas!
I was so eager to create this I actually didn't get before photos. I started out with a great picture frame that I picked up at a yard sale. I removed the print and carefully removed the glass. This was a nice sized frame. I don't have exact measurements but I am guessing around 24"x36". I painted frame with Duck Egg Blue and lightly distressed it.
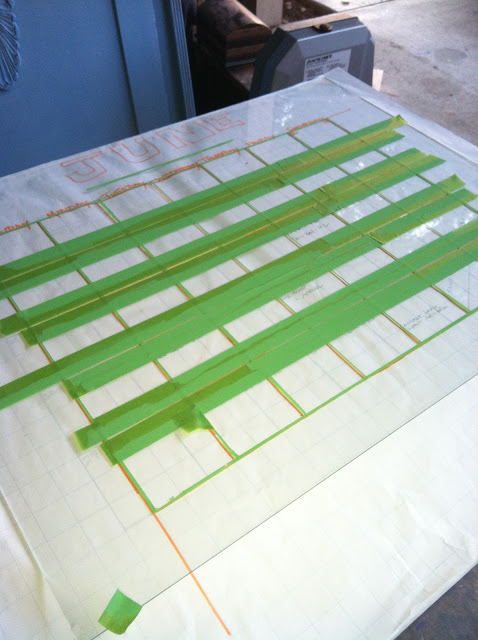
The glass is where my work began. I am sure there is a very mathematical and correct way to measuring out your grid, however I am not a math wiz! I had some large graph paper that I had previously made into a giant calendar for my wall so I grabbed that and used it as my template. I layed glass directly over my graph paper and used some of that amazing Frog Tape to tape off my grid lines (Frog Tape is a little more pricier than the blue painters tape but is worth the every extra cent!) This took some time. I did all my vertical lines first and painted the grid with Antibes Chalk Paint. Yes I just said I painted directly on glass with chalk paint, it worked fantastic! I did two coats so that it had a nice bold appearance. I removed tape and repeated the steps to create my horizontal lines.
This is what it looked like when I was complete. It wasn't perfect, but thats okay with me I love a homemade look it adds character!
Next it was time to add some fabric and get this all put together. When you are choosing your background for a dry erase board it is important to use a subtle print, so that it doesn't compete with what you write on the dry erase board. I am a big fan of using the back side of fabric so thats what I did on this piece.
I cut the fabric to fit and used some spray adhesive on the backing of the frame to keep fabric in place. This is very important *** When you install glass into frame make sure you place the painted side of glass towards fabric *** Otherwise the first time you clean your dry erase board you will remove your grid that you worked so hard on. This is what it looks like all put together.
and here it is with the the month of July....
 |
| This is Functional Art!!!!! |
Wouldn't this look amazing in a home office? WOW!
I linked up at:


Wow! Love this! Is it too wide to fit on a door? I'd love to put it in my kitchen but there will be almost no wall space after I put up my giant white board :)
ReplyDeleteIt is bigger then a standard door it is like 3ft wide or bigger. I have it in Fabulous Finds right now so I can't measure. But it is pretty big. What do you use your white board for?
ReplyDeleteKelly, I loooove it!! You're a genius girl!! You should be linking this up to all kinds of parties!! I might just have to be a copycat and make my own!
ReplyDeletexoxo
Jeri
Jeri, I am a newby how do I link up?? I am so excited to learn! Make away girl they are great projects!
ReplyDeleteCopy and paste the "button" from that particular blogger and add it to the html part of your post that you're linking up. At the bottom of the linky parties there's a button that usually says "link up" if you click on it the page a come up. After you've put the button in your post and saved it copy and paste the link to the post that you want to share ie: http://shabulousbykellyj.blogspot.com/2012/07/fancy-dry-erase-calendar.html?showComment=1341978997762# There's also a space for "name" that's where you put the title of your project and your email, etc. There's a blogger that has a step by step video thta helped me a lot, it's a little long but explains it better than me lol http://kellisretrokitchenarts.wordpress.com/2012/04/29/tutorial-on-how-to-participate-in-a-linky-party/
ReplyDeletePlease let me know if you need if you need any other help and let me know how you do!! Feel free to send me a friend request on facebook too =)
oooo and get rid of the word verification, a lot of bloggers won't leave comments or anything if you have that on.
Oh Kelly,
ReplyDeleteI love, love, love this idea. I have a few frames just laying around waiting for me to do something with...Yay! I have been inspired. Thank you...Oh, and thank you for becoming a follower. Hope you come and visit again soon. Wishing you a great day.
Hugs and Kisses,
♥Ana
nike shoes
ReplyDeletecheap jordans
supreme hoodie
yeezy boost 350
curry 6
birkin bag
golden goose shoes
nike air max 90
kyrie 6
cheap jordans
xiaofang20191222